반응형
우리가 Arduino나 마이크로 프로세서 등을 사용할 때 I/O를 이용하는 가장 기본적으로 예는 바로 버튼일 것이다.
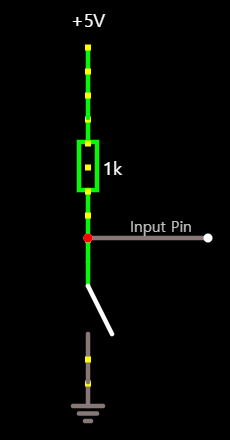
이같은 회로를 바로 사용하면 채터링(Chattering) 현상이 발생하게 되는데 시그널로 확인해본다면 아래와 같다.

채터링 현상이 일어나는동안 SW적으로 데이터를 읽으면 1도 아니고 0도 아닌 이상한 상태가 되어 의도하지 않은 값을 읽어올수 있다. 이와 같은 상황을 해결하기 위해서 Debouncing이라는 기법을 이용하여 해결한다. 쉽게 설명하여 버튼 입력이 일어나는 동안 Debouncing Time만큼 입력을 무시하면 된다.
그리고 또한 실제 개발 환경에서는 이러한 버튼들에 대해 많은 I/O를 할당 하기 어려운 경우들이 대부분이다. 그러면 적은 수의 버튼을 이용하여 셋팅이나 조작을 해야하는데 대표적으로 길게 누르기와 한번 누르기가 될수 있다.
// ButtonControl.h
#pragma once

/// Button Event Type
#define NON             0
#define CLICKED         1
#define LONG_CLICKED    2

class ButtonControl
{
private:
    uint8_t _pin;
    unsigned long _lastMillis;
    uint16_t _debouncingTime;
	unsigned long _pressedMillis;

    int _prev;

public:
    ButtonControl();
    ~ButtonControl();

    void Begin(uint8_t pin, uint16_t debouncingTime);

    int GetKeyEvent();
};
// ButtonControl.cpp
#include <Control/ButtonControl.h>

ButtonControl::ButtonControl()
{
    _lastMillis = 0;
	_pressedMillis = 0;
    _prev = HIGH;
}

ButtonControl::~ButtonControl()
{
}

void ButtonControl::Begin(uint8_t pin, uint16_t debouncingTime)
{
    _pin = pin;
    _debouncingTime = debouncingTime;
    pinMode(_pin,INPUT_PULLUP);
}

int ButtonControl::GetKeyEvent()
{
    int btn = digitalRead(_pin);

    unsigned long currentMillis = millis();

    if(btn == LOW && _prev == HIGH){
        _pressedMillis = currentMillis;
    }

    if(currentMillis - _pressedMillis > 1500 && (btn == LOW && _prev == LOW)){
		_lastMillis = currentMillis;
        _pressedMillis = currentMillis;
        _prev = HIGH;
		return LONG_CLICKED;
	}

    if(btn == HIGH && _prev == LOW){
        if((currentMillis - _lastMillis) >= _debouncingTime){
			_lastMillis = currentMillis;
			_pressedMillis = currentMillis;
            _prev = btn;
            return CLICKED;
        }
    }
    _prev = btn;
    return NON;
}
위와 같은 코드를 이용하여 1.5초동안 길게 누르고 있으면 Long click, 그냥 누르면 click의 정보를 반환하게 된다.
반응형
'프로그래밍 > IoT' 카테고리의 다른 글
| [IoT] WiFi Max RSSI인 SSID 얻기 (0) | 2020.09.14 |
|---|---|
| [Arduino] Serial Log 관리 (0) | 2020.09.14 |
| [IoT] esp32 Flash Download Tools 이용하여 업로드 (0) | 2020.09.14 |
| [IoT] Arduino IDE 개발환경 구축하기 (1) | 2020.08.03 |
| [IoT] 개발 보드 선정하기 (0) | 2020.08.03 |